Network performance tunning
Good Topic:
Ref: https://blog.cloudflare.com/how-to-receive-a-million-packets/
HW Spec: They both have two 6-core 2GHz Xeon processors. With hyperthreading (HT) enabled that counts to 24 processors on each box. The boxes have a multi-queue 10G network card by Solarflare, with 11 receive queues configured. More on that later.
Crash course to multi-queue NICs:
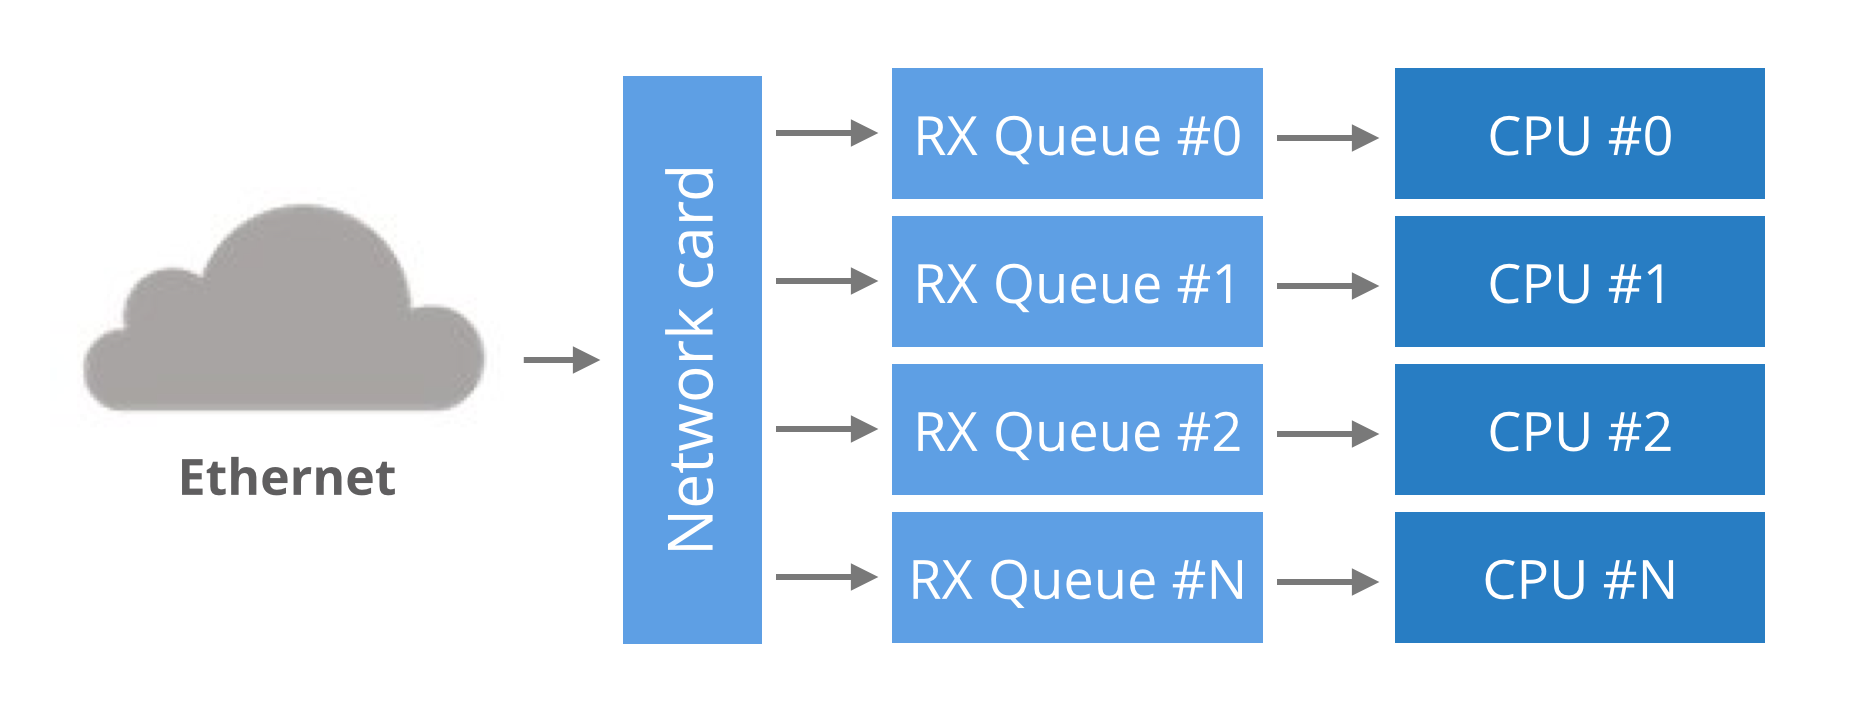
Historically, network cards had a single RX queue that was used to pass packets between hardware and kernel. This design had an obvious limitation - it was impossible to deliver more packets than a single CPU could handle.
To utilize multicore systems, NICs began to support multiple RX queues. The design is simple: each RX queue is pinned to a separate CPU, therefore, by delivering packets to all the RX queues a NIC can utilize all CPUs. But it raises a question: given a packet, how does the NIC decide to which RX queue to push it?
Round-robin balancing is not acceptable, as it might introduce reordering of packets within a single connection. An alternative is to use a hash from packet to decide the RX queue number. The hash is usually counted from a tuple (src IP, dst IP, src port, dst port). This guarantees that packets for a single flow will always end up on exactly the same RX queue, and reordering of packets within a single flow can't happen.
In our case, the hash could have been used like this:
RX_queue_number = hash('192.168.254.30', '192.168.254.1', 65400, 4321) % number_of_queues
Multi-queue hashing algorithms
The hash algorithm is configurable with
ethtool. On our setup it is:receiver$ ethtool -n eth2 rx-flow-hash udp4
UDP over IPV4 flows use these fields for computing Hash flow key:
IP SA
IP DA
This reads as: for IPv4 UDP packets, the NIC will hash (src IP, dst IP) addresses. i.e.:
RX_queue_number = hash('192.168.254.30', '192.168.254.1') % number_of_queues
This is pretty limited, as it ignores the port numbers. Many NICs allow customization of the hash. Again, using
ethtool we can select the tuple (src IP, dst IP, src port, dst port) for hashing:receiver$ ethtool -N eth2 rx-flow-hash udp4 sdfn
Cannot change RX network flow hashing options: Operation not supported
Unfortunately our NIC doesn't support it - we are constrained to (src IP, dst IP) hashing.
TIPS:(1) While we could have used the usual
send syscall, it wouldn't be efficient. Context switches to the kernel have a cost and it is be better to avoid it. Fortunately a handy syscall was recently added to Linux: sendmmsg. It allows us to send many packets in one go.
TIPS:(2) Fortunately, there is a workaround recently added to Linux: the SO_REUSEPORT flag. When this flag is set on a socket descriptor, Linux will allow many processes to bind to the same port. In fact, any number of processes will be allowed to bind and the load will be spread across them.
With
SO_REUSEPORT each of the processes will have a separate socket descriptor. Therefore each will own a dedicated UDP receive buffer. This avoids the contention issues previously encountered:receiver$ taskset -c 1,2,3,4 ./udpreceiver1 0.0.0.0:4321 4 1
1.114M pps 34.007MiB / 285.271Mb
1.147M pps 34.990MiB / 293.518Mb
1.126M pps 34.374MiB / 288.354Mb
This is more like it! The throughput is decent now!
More investigation will reveal further room for improvement. Even though we started four receiving threads, the load is not being spread evenly across them:
Two threads received all the work and the other two got no packets at all. This is caused by a hashing collision, but this time it is at the
SO_REUSEPORT layer.
-----------------------------------------------------------------------------------
== My Observation ==
Below shows how to check NIC is has how many RX-TX queues
[root@localhost ~]# cat /proc/interrupts | grep ens192
57: 14481874 8881296 446331 2463896 PCI-MSI-edge ens192-rxtx-0
58: 11724321 5151965 722736 6279171 PCI-MSI-edge ens192-rxtx-1
59: 1339 4112623 0 1338260993 PCI-MSI-edge ens192-rxtx-2
60: 411242882 920999779 0 3695065 PCI-MSI-edge ens192-rxtx-3
61: 0 0 0 0 PCI-MSI-edge ens192-event-4
[root@localhost ~]#
(or) run below to show rx and tx queues
[root@localhost ~]# ls /sys/class/net/ens192/queues/
rx-0 rx-1 rx-2 rx-3 tx-0 tx-1 tx-2 tx-3
[root@localhost ~]#
[ref]: You can see how many queues that you have available with:
If you have multiple queues enabled, they will show up. In addition you can watch traffic on the rx (tx) queues with the watch command:
watch -d -n 2 "ethool -S [interface] | grep rx | grep packets | column"
ethtool -S [interface]If you have multiple queues enabled, they will show up. In addition you can watch traffic on the rx (tx) queues with the watch command:
watch -d -n 2 "ethool -S [interface] | grep rx | grep packets | column"
For Filtering Queues, use:
If you have ADq or DCB queues they will show up here.
tc qdisc show dev [interface]If you have ADq or DCB queues they will show up here.
The documentation at https://www.kernel.org/doc/Documentation/networking/multiqueue.txt has a number of useful concepts and uses the
tc command to manipulate the available multiqueue parameters. Without knowing your intentions, it's difficult to give a specific answer, but this information should get you pointed in the right direction.
-------------------------------------------------------------------------------------------------------------
Another topic: https://blog.cloudflare.com/how-to-achieve-low-latency/
TIPS:(3) RSS - Receive Side Scaling
In the previous article we mentioned that the NIC hashes packets in order to spread the load across many RX queues. This technique is called RSS - Receive Side Scaling. We can see it in action by observing the
In the previous article we mentioned that the NIC hashes packets in order to spread the load across many RX queues. This technique is called RSS - Receive Side Scaling. We can see it in action by observing the
/proc/net/softnet_stat file with the softnet.sh script:
---------------------------------------------------------------------------------------------------------------