Showing posts with label Linux. Show all posts

Tuesday, March 14, 2023

Useful linux commands


export TZ=Asia/Tokyo  # to set timezone for single terminal  [Click]

Saturday, October 1, 2022

Monitoring a Process Mem and CPU in Linux


Explained about Virtual Memory and Hows it works with Block diagram

https://www.cs.uic.edu/~jbell/CourseNotes/OperatingSystems/9_VirtualMemory.html 


https://www.digitalocean.com/community/tutorials/atop-command-in-linux

Useful option: 

atop

  • SYSCPU - The amount of CPU consumed by the process while system handling.
  • USRCPU - The amount of CPU consumed by the process, during its running in user mode.
  • VGROW - The amount of virtual memory that the process has occupied since the last value update.
  • RGROW - The amount of resident (physical) memory grown since last value update.
  • RDDSK - The size of data transferred during disk reads.
  • WRDSK - The size of data transferred during disk writes.
  • RUID - The real user ID under which the process is being executed.
  • EUID - The effective user ID under which the process is being executed.
  • ST - The current status of the process.
  • EXC - The exit code after the process terminates
  • THR - The number of threads within the process.
  • S - The current status of the primary thread of the process.
  • CPU - The percentage of CPU utilization of the entire process.
  • CMD - The name of the process.

 atop -m 

  • MINFLT - The number of minor page faults that have been solved by accessing data from free pages.
  • MAJFLT - The number of major page faults that have been solved by especially retrieving data from disk.
  • VSTEXT - The virtual memory occupied by the process text.
  • VSLIBS - The virtual memory occupied by the shared libraries of the process.
  • VDATA - The virtual memory size of the private data of the process.
  • VSTACK - The virtual memory size of the private stack of the process.
  • VSIZE - The total virtual memory size of the process.
  • RSIZE - The total resident memory occupied by the process.
  • MEM - The percentage of RAM consumed by the process.


Wednesday, December 8, 2021

Networking Tips


UDP Packet tcpdump and print message:

       tcpdump  -i ens192 -nnvv -A  udp port 5060 -s0 #this will print with ttl info

       tcpdump  -i ens192 -nn -A  udp port 5060 -s0 # this just print packet content

UDP Send Message:


       echo -n "hello" >/dev/udp/remoteIpAddr/5060


Found an interesting JVM Flag :

java -XX:+UnlockDiagnosticVMOptions -XX:+PrintFlagsFinal -version

It prints hundreds of various options, I never heard about before. It also prints default values, that helps diagnose JVM behaviors better. Another interesting flag is:

-XX:+UnlockExperimentalVMOptions

Other JVM Flag :
To trigger heap dump on out of memory, you can use
 -XX:+HeapDumpOnOutOfMemoryError

This JVM option produces a stack dump when your JVM dies with OutOfMemory Error. There is no expense involved unless an OOM really occurs. This flag is a requisite for production systems as it is usually the only way to determine the problem deeply.

The heap dump will be set up in the “current directory” of the JVM by default. If you wish to create heap dumps on specific directory, then run

-XX:HeapDumpPath= [path-to-heap-dump-directory]
-XX:+UseGCOverheadLimit
-XX:OnOutOfMemoryError="< cmd args >;< cmd args >"
If we want to restart the server immediately after out of memory occur, then we can
set this parameter of the same purpose –
XX:OnOutOfMemoryError="shutdown -r"

Wednesday, November 10, 2021

Bit-bucket pull request conflict resolve

 #1. resolving the conflict in bit bucket pull request

git checkout commit-id

eg:

$git branch -a

* (HEAD detached from eb9e6ce)

  master

  test

  remotes/origin/HEAD -> origin/master

  remotes/origin/master

  remotes/origin/test


#2. merge the changes from master to the detached HEAD,so both changes will be there if conflict

git merge remotes/origin/master

HEAD>>>>

<<<<<<


#3. resolve the conflit and commit it ....

git add files

git commit -m "conflict resolved" # status shows (HEAD -> test)


#4. Pushing the commit to the remote and switch to the target branch and pull

git push origin HEAD:refs/heads/test

git checkout <branch-name>

git pull #status shows conflict fixed (HEAD -> test, origin/test)


#5. In bit bucket the master changes will be sync to the test branch
Saturday, January 11, 2020

Network performance tunning

Network performance tunning

Good Topic:
 Ref: https://blog.cloudflare.com/how-to-receive-a-million-packets/

HW Spec: They both have two 6-core 2GHz Xeon processors. With hyperthreading (HT) enabled that counts to 24 processors on each box. The boxes have a multi-queue 10G network card by Solarflare, with 11 receive queues configured. More on that later. 

Crash course to multi-queue NICs:
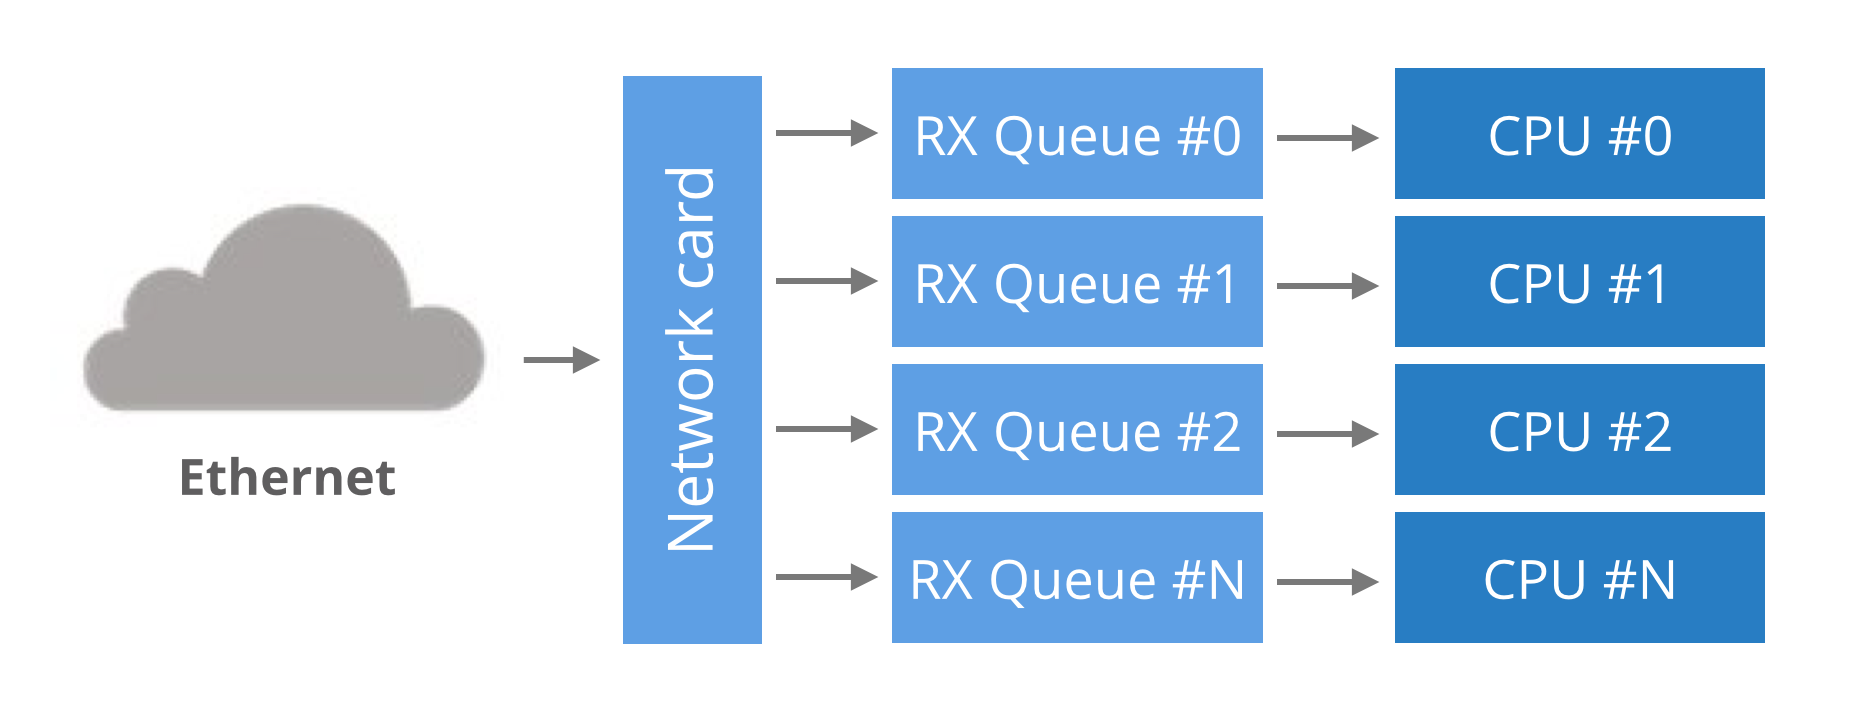
Historically, network cards had a single RX queue that was used to pass packets between hardware and kernel. This design had an obvious limitation - it was impossible to deliver more packets than a single CPU could handle.
To utilize multicore systems, NICs began to support multiple RX queues. The design is simple: each RX queue is pinned to a separate CPU, therefore, by delivering packets to all the RX queues a NIC can utilize all CPUs. But it raises a question: given a packet, how does the NIC decide to which RX queue to push it?
multiqueue nic
Round-robin balancing is not acceptable, as it might introduce reordering of packets within a single connection. An alternative is to use a hash from packet to decide the RX queue number. The hash is usually counted from a tuple (src IP, dst IP, src port, dst port). This guarantees that packets for a single flow will always end up on exactly the same RX queue, and reordering of packets within a single flow can't happen.
In our case, the hash could have been used like this:
RX_queue_number = hash('192.168.254.30', '192.168.254.1', 65400, 4321) % number_of_queues

Multi-queue hashing algorithms

The hash algorithm is configurable with ethtool. On our setup it is:
receiver$ ethtool -n eth2 rx-flow-hash udp4
UDP over IPV4 flows use these fields for computing Hash flow key:
IP SA
IP DA
This reads as: for IPv4 UDP packets, the NIC will hash (src IP, dst IP) addresses. i.e.:
RX_queue_number = hash('192.168.254.30', '192.168.254.1') % number_of_queues
This is pretty limited, as it ignores the port numbers. Many NICs allow customization of the hash. Again, using ethtool we can select the tuple (src IP, dst IP, src port, dst port) for hashing:
receiver$ ethtool -N eth2 rx-flow-hash udp4 sdfn
Cannot change RX network flow hashing options: Operation not supported
Unfortunately our NIC doesn't support it - we are constrained to (src IP, dst IP) hashing.
TIPS:(1) While we could have used the usual send syscall, it wouldn't be efficient. Context switches to the kernel have a cost and it is be better to avoid it. Fortunately a handy syscall was recently added to Linux: sendmmsg. It allows us to send many packets in one go.
TIPS:(2) Fortunately, there is a workaround recently added to Linux: the SO_REUSEPORT flag. When this flag is set on a socket descriptor, Linux will allow many processes to bind to the same port. In fact, any number of processes will be allowed to bind and the load will be spread across them.
With SO_REUSEPORT each of the processes will have a separate socket descriptor. Therefore each will own a dedicated UDP receive buffer. This avoids the contention issues previously encountered:
receiver$ taskset -c 1,2,3,4 ./udpreceiver1 0.0.0.0:4321 4 1
  1.114M pps  34.007MiB / 285.271Mb
  1.147M pps  34.990MiB / 293.518Mb
  1.126M pps  34.374MiB / 288.354Mb

This is more like it! The throughput is decent now!
More investigation will reveal further room for improvement. Even though we started four receiving threads, the load is not being spread evenly across them:
port uneven
Two threads received all the work and the other two got no packets at all. This is caused by a hashing collision, but this time it is at the SO_REUSEPORT layer.
-----------------------------------------------------------------------------------
== My Observation ==
Below shows how to check NIC is has how many RX-TX queues
[root@localhost ~]# cat /proc/interrupts | grep ens192
  57:   14481874    8881296     446331    2463896   PCI-MSI-edge      ens192-rxtx-0
  58:   11724321    5151965     722736    6279171   PCI-MSI-edge      ens192-rxtx-1
  59:       1339    4112623          0 1338260993   PCI-MSI-edge      ens192-rxtx-2
  60:  411242882  920999779          0    3695065   PCI-MSI-edge      ens192-rxtx-3
  61:          0          0          0          0   PCI-MSI-edge      ens192-event-4
[root@localhost ~]# 


(or) run below to show rx and tx queues
[root@localhost ~]# ls /sys/class/net/ens192/queues/
rx-0  rx-1  rx-2  rx-3  tx-0  tx-1  tx-2  tx-3
[root@localhost ~]# 
[ref]: You can see how many queues that you have available with: ethtool -S [interface]
If you have multiple queues enabled, they will show up. In addition you can watch traffic on the rx (tx) queues with the watch command:
watch -d -n 2 "ethool -S [interface] | grep rx | grep packets | column"
For Filtering Queues, use: tc qdisc show dev [interface]
If you have ADq or DCB queues they will show up here.
The documentation at https://www.kernel.org/doc/Documentation/networking/multiqueue.txt has a number of useful concepts and uses the tc command to manipulate the available multiqueue parameters. Without knowing your intentions, it's difficult to give a specific answer, but this information should get you pointed in the right direction.
-------------------------------------------------------------------------------------------------------------
TIPS:(3) RSS - Receive Side Scaling

In the previous article we mentioned that the NIC hashes packets in order to spread the load across many RX queues. This technique is called RSS - Receive Side Scaling. We can see it in action by observing the /proc/net/softnet_stat file with the softnet.sh script:
---------------------------------------------------------------------------------------------------------------


Tuesday, January 7, 2020

iptables Notes

How does iptables work?

other link: 
iptables is just a command-line interface to the packet filtering functionality in netfilter. However, to keep this article simple, we won’t make a distinction between iptables and netfilter in this article, and simply refer to the entire thing as “iptables”.
The packet filtering mechanism provided by iptables is organized into three different kinds of structures: tables, chains and targets. Simply put, a table is something that allows you to process packets in specific ways. The default table is the filter table, although there are other tables too.
Again, these tables have chains attached to them. These chains allow you to inspect traffic at various points, such as when they just arrive on the network interface or just before they’re handed over to a process. You can add rules to them match specific packets — such as TCP packets going to port 80 — and associate it with a target. A target decides the fate of a packet, such as allowing or rejecting it.
When a packet arrives (or leaves, depending on the chain), iptables matches it against rules in these chains one-by-one. When it finds a match, it jumps onto the target and performs the action associated with it. If it doesn’t find a match with any of the rules, it simply does what the default policy of the chain tells it to. The default policy is also a target. By default, all chains have a default policy of allowing packets.

Tables

As we’ve mentioned previously, tables allow you to do very specific things with packets. On a modern Linux distributions, there are four tables:
  • The filter table: This is the default and perhaps the most widely used table. It is used to make decisions about whether a packet should be allowed to reach its destination.
  • The mangle table: This table allows you to alter packet headers in various ways, such as changing TTL values.
  • The nat table: This table allows you to route packets to different hosts on NAT (Network Address Translation) networks by changing the source and destination addresses of packets. It is often used to allow access to services that can’t be accessed directly, because they’re on a NAT network.
  • The raw table: iptables is a stateful firewall, which means that packets are inspected with respect to their “state”. (For example, a packet could be part of a new connection, or it could be part of an existing connection.) The raw table allows you to work with packets before the kernel starts tracking its state. In addition, you can also exempt certain packets from the state-tracking machinery.
In addition, some kernels also have a security table. It is used by SELinux to implement policies based on SELinux security contexts.

Chains

Now, each of these tables are composed of a few default chains. These chains allow you to filter packets at various points. The list of chains iptables provides are:
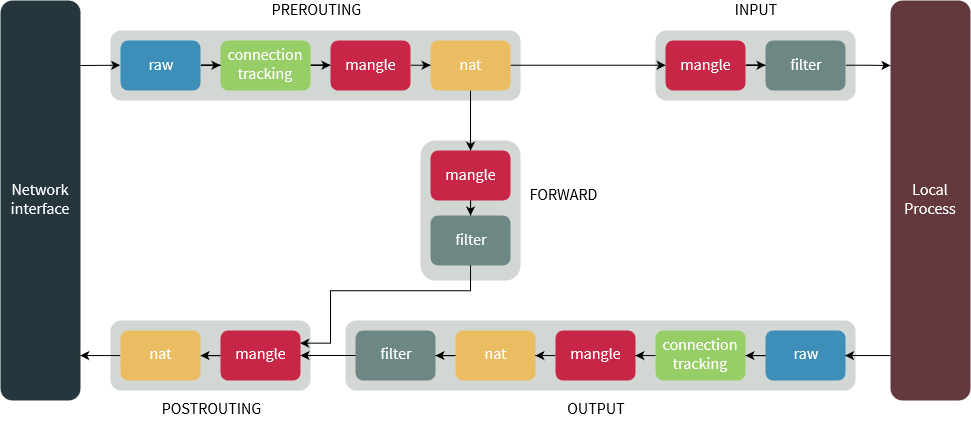
  • The PREROUTING chain: Rules in this chain apply to packets as they just arrive on the network interface. This chain is present in the nat, mangle and raw tables.
  • The INPUT chain: Rules in this chain apply to packets just before they’re given to a local process. This chain is present in the mangle and filter tables.
  • The OUTPUT chain: The rules here apply to packets just after they’ve been produced by a process. This chain is present in the raw, mangle, nat and filter tables.
  • The FORWARD chain: The rules here apply to any packets that are routed through the current host. This chain is only present in the mangle and filter tables.
  • The POSTROUTING chain: The rules in this chain apply to packets as they just leave the network interface. This chain is present in the nat and mangle tables.
The diagram below shows the flow of packets through the chains in various tables:


Targets

As we’ve mentioned before, chains allow you to filter traffic by adding rules to them. So for example, you could add a rule on the filter table’s INPUT chain to match traffic on port 22. But what would you do after matching them? That’s what targets are for — they decide the fate of a packet.
Some targets are terminating, which means that they decide the matched packet’s fate immediately. The packet won’t be matched against any other rules. The most commonly used terminating targets are:
  • ACCEPT: This causes iptables to accept the packet.
  • DROP: iptables drops the packet. To anyone trying to connect to your system, it would appear like the system didn’t even exist.
  • REJECT: iptables “rejects” the packet. It sends a “connection reset” packet in case of TCP, or a “destination host unreachable” packet in case of UDP or ICMP.
On the other hand, there are non-terminating targets, which keep matching other rules even if a match was found. An example of this is the built-in LOG target. When a matching packet is received, it logs about it in the kernel logs. However, iptables keeps matching it with rest of the rules too.
Sometimes, you may have a complex set of rules to execute once you’ve matched a packet. To simplify things, you can create a custom chain. Then, you can jump to this chain from one of the custom chains.

Blocking IPs

The most common use for a firewall is to block IPs. Say for example, you’ve noticed the IP 59.45.175.62 continuously trying to attack your server, and you’d like to block it. We need to simply block all incoming packets from this IP. So, we need to add this rule to the INPUT chain of the filter table. You can do so with:
iptables -t filter -A INPUT -s 59.45.175.62 -j REJECT
Let us break that down. The -t switch specifies the table in which our rule would go into — in our case, it’s the filter table. The -A switch tells iptables to “append” it to the list of existing rules in the INPUT chain. However, if this is the first time you’re working with iptables, there won’t be any other rules, and this will be the first one.
As you might have guessed, the -s switch simply sets the source IP that should be blocked. Finally, the -j switch tells iptables to “reject” traffic by using the REJECT target. If you want iptables to not respond at all, you can use the DROP target instead.
Previously, we’ve mentioned that the filter table is used by default. So you can leave it out, which saves you some typing:
iptables -A INPUT -s 59.45.175.62 -j REJECT
You can also block IP ranges by using the CIDR notation. If you want to block all IPs ranging from 59.145.175.0 to 59.145.175.255, you can do so with:
iptables -A INPUT -s 59.45.175.0/24 -j REJECT
If you want to block output traffic to an IP, you should use the OUTPUT chain and the -d flag to specify the destination IP:
iptables -A OUTPUT -d 31.13.78.35 -j DROP
Listing rules:
iptables -L --line-numbers
Deleting Rules:
iptables -D INPUT -s 221.194.47.0/24 -j REJECT
Flush all the INPUT rules
iptables -F INPUT

Monday, June 3, 2019

MYSQL Useful commands:


1. TO Get the Database size in Mysql

SELECT table_schema AS 'Database Name', ROUND(SUM(data_length + index_length) / 1024 / 1024, 2) AS 'Size in (MB)' FROM information_schema.TABLES GROUP BY table_schema;

2. Take Schema backup ( backup with no data )
mysqldump -u root -p --no-data dbname > schema.sql

Sunday, October 15, 2017

Creating swap space in Embedded System

It seems that you have insufficient RAM to build matplotlib from scratch. To overcome that, either turn on swap:
# create swap file of 512 MB
dd if=/dev/zero of=/swapfile bs=1024 count=524288
# modify permissions
chown root:root /swapfile
chmod 0600 /swapfile
# setup swap area
mkswap /swapfile
# turn swap on
swapon /swapfile
Or, if you have raspbian installed on your SD card, you can install matplotlib from the repository:
apt-get install python-matplotlib