Friday, July 5, 2019

Java Decimal Round of Understanding:

double[] doubleList= {
        0.001,
        0.0012,
        0.00123,
        0.001234,
        0.0012345,
        0.1234567,
        0.0000001,
        0.0000005,
        0.0000006,
        0.0000009,
     1234.00000001,
        0.00000005,
        0.00000006,
        0.00000009,
        0.111111111,
        0.000000005,
        0.000000006,
        0.000000009,
        1.9,
        0.09,
        0.009,
        0.00999,
        0.009999,
        0.0099999,
        0.00999999,
        0.999999999};
for (double d:doubleList) {
    System.out.println("   round7: "+roundOfForBilling(d)+" val="+d );
}
public static double  roundOfForBilling(double value) {
    DecimalFormat df = new DecimalFormat("0.0000000");
    df.setRoundingMode(RoundingMode.UP);
    //df.setMaximumFractionDigits(7);    
    System.out.print(" format:"+df.format(value)+
                     " rm="+df.getMaximumFractionDigits());
    return Double.parseDouble(df.format(value));
}
Output:
 format:0.0010000 mode=UP   round7: 0.001     val=0.001
 format:0.0012000 mode=UP   round7: 0.0012    val=0.0012
 format:0.0012300 mode=UP   round7: 0.00123   val=0.00123
 format:0.0012340 mode=UP   round7: 0.001234  val=0.001234
 format:0.0012345 mode=UP   round7: 0.0012345 val=0.0012345
 format:0.1234567 mode=UP   round7: 0.1234567 val=0.1234567
 format:0.0000001 mode=UP   round7: 1.0E-7    val=1.0E-7
 format:0.0000005 mode=UP   round7: 5.0E-7    val=5.0E-7
 format:0.0000006 mode=UP   round7: 6.0E-7    val=6.0E-7
 format:0.0000009 mode=UP   round7: 9.0E-7    val=9.0E-7
 format:1234.0000001 mode=UP   round7: 1234.0000001 val=1234.00000001
 format:0.0000001 mode=UP   round7: 1.0E-7    val=5.0E-8
 format:0.0000001 mode=UP   round7: 1.0E-7    val=6.0E-8
 format:0.0000001 mode=UP   round7: 1.0E-7    val=9.0E-8
 format:0.1111112 mode=UP   round7: 0.1111112 val=0.111111111
 format:0.0000000 mode=UP   round7: 0.0       val=5.0E-9
 format:0.0000000 mode=UP   round7: 0.0       val=6.0E-9
 format:0.0000000 mode=UP   round7: 0.0       val=9.0E-9
 format:1.9000000 mode=UP   round7: 1.9       val=1.9
 format:0.0900000 mode=UP   round7: 0.09      val=0.09
 format:0.0090000 mode=UP   round7: 0.009     val=0.009
 format:0.0099900 mode=UP   round7: 0.00999   val=0.00999
 format:0.0099990 mode=UP   round7: 0.009999  val=0.009999
 format:0.0099999 mode=UP   round7: 0.0099999 val=0.0099999
 format:0.0100000 mode=UP   round7: 0.01      val=0.00999999
 format:1.0000000 mode=UP   round7: 1.0       val=0.999999999

RoundingMode.UP
RoundingMode.DOWN        we use this more 0.00000 you will find
RoundingMode.HALF_UP     (but this reduce)
RoundingMode.HALF_EVEN

Monday, June 3, 2019

MYSQL Useful commands:


1. TO Get the Database size in Mysql

SELECT table_schema AS 'Database Name', ROUND(SUM(data_length + index_length) / 1024 / 1024, 2) AS 'Size in (MB)' FROM information_schema.TABLES GROUP BY table_schema;

2. Take Schema backup ( backup with no data )
mysqldump -u root -p --no-data dbname > schema.sql

Saturday, June 16, 2018

Java Understanding


Java Design pattern....

1) Singleton Pattern. 
2) Factory - The instance of varies similar object will be available in single point. Hence maintenance  is easy. simply same kind of object can be removed
3) Model View Controller   -  Link : http://en.wikipedia.org/wiki/File:MVC-Process.svg 
4) Model View Presenter - 
5) FODA - Feature Oriented Design - To build the Mandatory , Optional and Dependent feature for the image
6) Facada - Act as Abstract for a module
7) Observable Patter

ASOP - Aspect oriented Programming in Spring.
OSGI - Concept to upgrading a class object without stopping the server ... in on the line

- Static Proxy - apache has
- Dynamic Proxy
- Generics -

JCP - Java Community Programming  - Forum to decalre interfaces eg servlet, JAIN sip, etc ... 

Tuesday, January 2, 2018

Aloe Vera Cultivation


http://www.expert-market.com/aloe-vera-farming-a-profitable-business-to-start-business-plan/

Different varieties of Aloe vera which is very popular in trade are:- Chinensis , Littorallis and Aloe Abyssinica are the different varieties of aloe vera however for aloe vera farming in india IEC 111271 , AAL1 , IEC 111269 are highly productive hybrid for farming.
Selection of land in Aloevera farming:- Initially 2 acre of land is needed for the profitable outcome at the beginning of Aloe Vera farming.it  is generally cultivated in the dry region with minimal rainfall and warm humid region.  So the suitable selection of land is required with dry region and low water stagnantation soils. Sandy soils are the best for its cultivation also well drained black cotton soils is very suitable for the perfect growth of Aloe Vera farming. In land selection we should select those land which is at little height with ground level so as to avoid rain water stagnation also the well drained light sandy soil is best.
Land Ploughing in Aloe Vera farming:- before starting of monsoon the field should be well prepared. Its time to plough the land. Land should be thoroughly ploughed till the soil become fine separated and drained. In order to increase the fertility of land just add 10 to 15 tonnes of organic farm yard maure. The PH of the soil should be 8.5 with the adequate salt content.
Propagation and Planting of aloe Vera :- Aloe Vera plant is propagated by rhizome cutting and also from root suckers, for its propagation the underground rhizome is dug out and suitable length recommended  5-5.5 cms is cut which must contain minimum of two to three nodes in it first it should be rooted in sand beds or particular container after its sprouting it is ready for the plantation. Similarly the root suckers is dug out from the parent plant and should be planted with a separation of 50×45 cms and length of rhizome cutting and root suckers must be in 12-15cms range. It is highly advisable that the two third portion of the plant should be inside ground.
Irrigation and pest control:-
After proper plantation the irrigation must be done as per the moisture content of the soil. Pest control is also very necessary step to be taken in order to avoid damage to the plant. Mealy Bug is the major threat to the aloe vera crop and the major disease is the spotting of leaves.
So for the aloe vera weeding plan proper spraying of 0.1% of parathion or 0.2% of malathion aqueous solution is needed. Also 0.2% dithane M-45 spraying should be done weekly to prevent from leaf spot.
Aloe vera harvesting:- If everything is done as prescribed above there would be a very profitable harvesting time. In almost 8 months first harvesting can be done. Manual harvesting is needed as the broken rhizome left in the soil will sprout again so special attention must be taken while harvesting the aloe vera plant. From the second year there would be a commercial yield of aloevera crop and will last upto 5 years. So from the second year the profit margin will grow unexpectedly. An average of 8,000 to 10,000 kg of aloe vera crop is obtained from 2 Acre of land.
http://www.agrifarming.in/cost-and-profits-of-aloe-vera-farming/


Tuesday, October 31, 2017

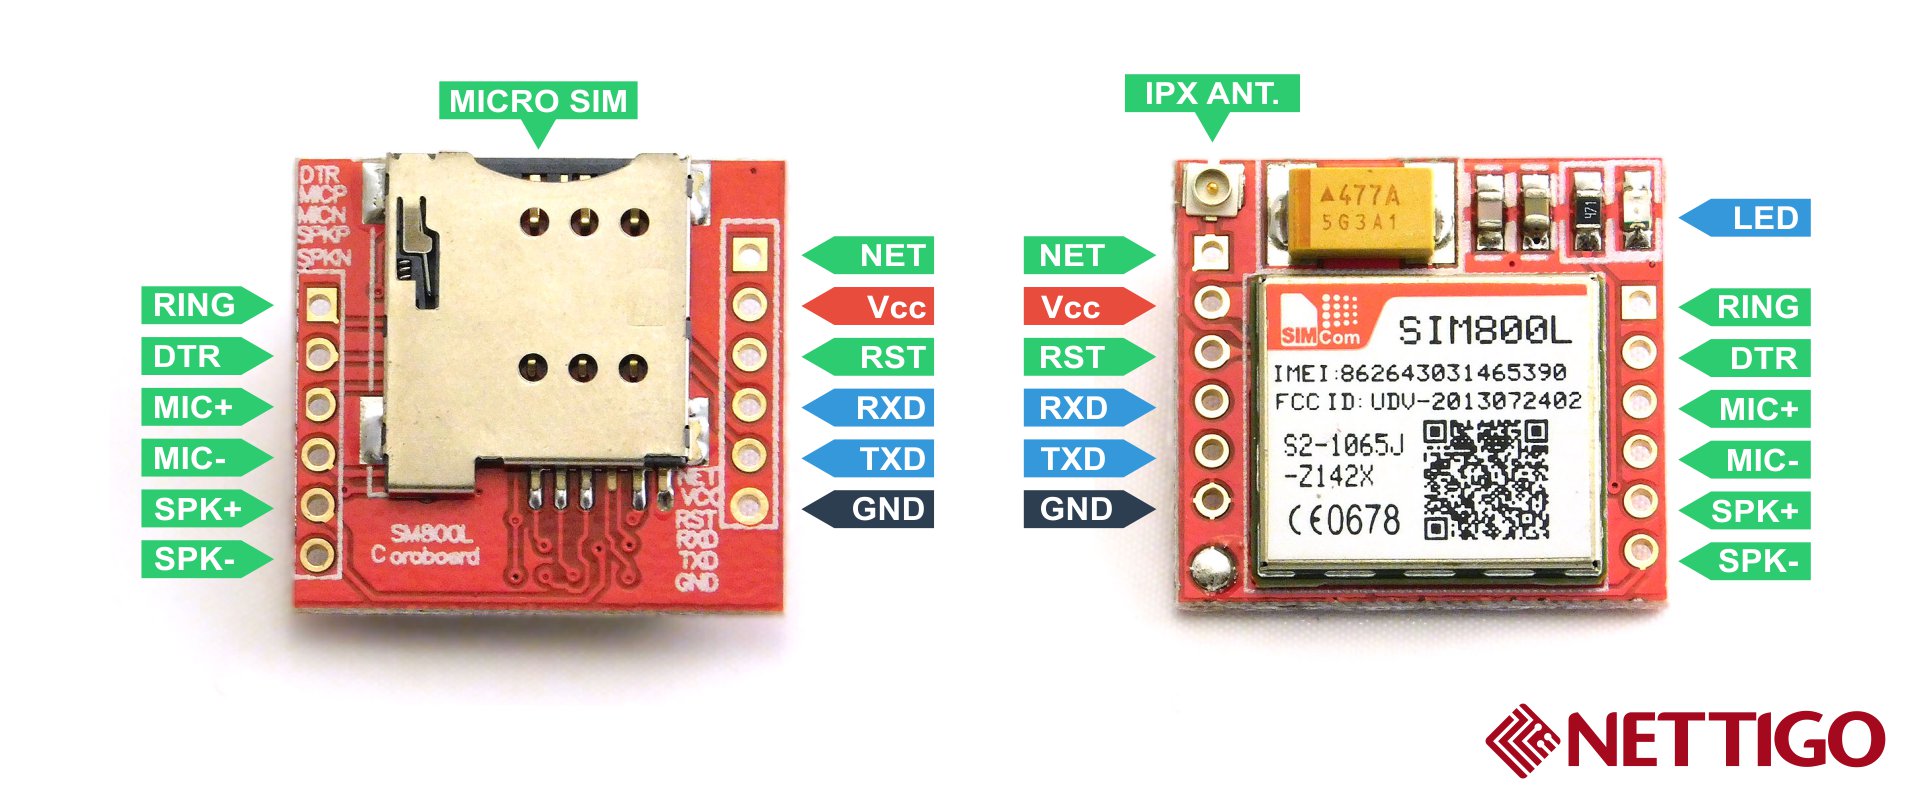
SIM800L Module Bringup


Check the SIM800L module working condition:
Specification: SIM800L Hardware spec
GSM Standard: GSM Standard - ETSI TS 127 007 - AT Commands
Courtesy: https://nettigo.eu/products/sim800l-gsm-grps-module

Mini GSM/GPRS module

SIM800L is a miniature cellular module which allows for GPRS transmission, sending and receiving SMS and making and receiving voice calls. Low cost and small footprint and quad band frequency support make this module perfect solution for any project that require long range connectivity. After connecting power module boots up, searches for cellular network and login automatically. On board LED displays connection state (no network coverage - fast blinking, logged in - slow blinking).
NOTICE: Be prepared to handle huge power consumption with peek up to 2A. Maximum voltage on UART in this module is 2.8V. Higher voltage will kill the module.

Two antennas!

This module have two antennas included. First is made of wire (which solders directly to NET pin on PCB) - very useful in narrow places. Second - PCB antenna - with double sided tape and attached pigtail cable with IPX connector. This one have better performance and allows to put your module inside a metal case - as long the antenna is outside.

Specification

  • Supply voltage: 3.8V - 4.2V
  • Recommended supply voltage: 4V
  • Power consumption:
    • sleep mode < 2.0mA
    • idle mode < 7.0mA
    • GSM transmission (avg): 350 mA
    • GSM transmission (peek): 2000mA
  • Module size: 25 x 23cm
  • Interface: UART (max. 2.8V) and AT commands
  • SIM card socket: microSIM (bottom side)
  • Supported frequencies: Quad Band (850 / 950 / 1800 /1900 MHz)
  • Antenna connector: IPX
  • Status signaling: LED
  • Working temperature range: -40 do + 85 ° C

Set includes:

  • SIM800L module
  • goldpin headers
  • wire antenna
  • PCB antenna with pigtail and IPX connector

Module pinout

ModuĊ‚ GSM GPRS SIM800L Pinout


Pinout (bottom side - left):
  • RING (not marked on PBC, first from top, square) - LOW state while receiving call
  • DTR - sleep mode. Default in HIGH state (module in sleep mode, serial communication disabled). After setting it in LOW the module will wake up.
  • MICP, MICN - microphone (P + / N -)
  • SPKP, SPKN - speaker (P + / N -)
Pinout (bottom side - right):
  • NET - antenna
  • VCC - supply voltage
  • RESET - reset
  • RXD - serial communication
  • TXD - serial communication
  • GND - ground
Moreinfo : https://github.com/stephaneAG/SIM800L/blob/master/README.md 

Sanity Test Connection: 


1.  Flash Arduino with empty code to connect SIM800L to laptop(Ardiuno act as USB to TTL converter) 

void setup() {

  // put your setup code here, to run once:

}

void loop() {

  // put your main code here, to run repeatedly:

}

3. Connect Arduino 3.3 V to VCC supply 800L and remove the SIM card ()
3. Connect GND to Arduino GND
4. Connect RX to Arduino RX0
5. Connect TX to Arduino TX0
6. Open Serial Monitor and choose 9600 or any 115200 baud rate, CR and LF, since 800L is supports auto baud rate


init the auto-bauder: AT
OK
get module name & version:ATI
SIM800 R14.18
turn on verbose errors:ATI+CMEE=2
SIM800 R14.18
get SIM card number:AT+CCID

get IMEI card number:AT+CGSN
to list available networks: AT+COPS=?

check that we're connected to a network:AT+COPS?
+COPS: 0
check signal strength:AT+CSQ
+CSQ: 26,0
check battery state:AT+CBC =?
+CBC: (0-2),(1-100),(voltage)
: Charge status
    0 ME is not charging
    1 ME is charging
    2 Charging has finished
: Battery connection level
    1...100 battery has 1-100 percent of capacity remaining

: Battery voltage(mV)
     0000 - 4700
check battery state:AT+CBC   (while i connected to 3.3v of Ardunio)
+CBC: 0,0,3286

pages: AT+CSCS=?
+CME ERROR: SIM not inserted

Observation: After inserting valid SIM CARD
check signal strength:AT+CSQ

+CSQ: 29,0
Syntax:  Response +CSQ: ,
  0 -115 dBm or less,
                 1 -111 dBm, 
                 2...30  -110...-54 dBm
                 31 -52 dBm or greater 
                 99 not known or not detectable 
(in %): 0...7 As RXQUAL values in the table in GSM 05.08 [20] subclause 7.2.4 
                 99 Not known or not detectable

Map value for range

long map(long x, long in_min, long in_max, long out_min, long out_max)
{
  return (x - in_min) * (out_max - out_min) / (in_max - in_min) + out_min;
}
Re-maps a number from one range to another. That is, a value of fromLow would get mapped to toLow, a value of fromHigh to toHigh, values in-between to values in-between, etc.
val = map(val, 0, 1023, 0, 255);
Ref: Arduino Reference Map

Sunday, October 15, 2017

Creating swap space in Embedded System

It seems that you have insufficient RAM to build matplotlib from scratch. To overcome that, either turn on swap:
# create swap file of 512 MB
dd if=/dev/zero of=/swapfile bs=1024 count=524288
# modify permissions
chown root:root /swapfile
chmod 0600 /swapfile
# setup swap area
mkswap /swapfile
# turn swap on
swapon /swapfile
Or, if you have raspbian installed on your SD card, you can install matplotlib from the repository:
apt-get install python-matplotlib

Thursday, February 23, 2017

Java method to print Hexadecimal

private static String convertToHexString(byte[] data, String append) { StringBuffer buf = new StringBuffer(); for (int i = 0; i < data.length; i++) { int halfbyte = (data[i] >>> 4) & 0x0F; int two_halfs = 0; do { if ((0 <= halfbyte) && (halfbyte <= 9)) buf.append((char) ('0' + halfbyte)); else buf.append((char) ('a' + (halfbyte - 10))); halfbyte = data[i] & 0x0F; } while(two_halfs++ < 1); if(append != null) buf.append(append); } return buf.toString(); }

Another Similar program:
http://www.baeldung.com/sha-256-hashing-java
private static String bytesToHex(byte[] hash) {
StringBuffer hexString = new StringBuffer();
for (int i = 0; i < hash.length; i++) {
String hex = Integer.toHexString(0xff & hash[i]);
if(hex.length() == 1) 
hexString.append('0');
hexString.append(hex);
  //hexString.append(' ');
}
return hexString.toString();
}
Output:
System.out.println("HexText: "+bytesToHex(data));
HexText: 13 0a 63 00 14 00 12 00 09 37 38 36 31 32 33 34 35 36
You can use constructor of String, which takes byte array and character encoding

String str = new String(bytes, "UTF-8");

This is the right way to convert bytes to String, provided you know for sure that bytes are encoded in the character encoding you are using.

Read more: https://javarevisited.blogspot.com/2014/08/2-examples-to-convert-byte-array-to-String-in-Java.html#ixzz5kn8lnEZi


  1. StandardCharsets.ISO_8859_1
  2. StandardCharsets.US_ASCII
  3. StandardCharsets.UTF_16
  4. StandardCharsets.UTF_16BE
  5. StandardCharsets.UTF_16LE
To view the Binary encoded Base64 in Hex String .... 

Monday, September 5, 2016

IPv6 Notes


Type if IPv6 Addressing modes:
1) Unicast addresses
2) Multicast addresses
3) Anycast addresses

# The following lines are desirable for IPv6 capable hosts
::1     ip6-localhost ip6-loopback
fe00::0 ip6-localnet
ff00::0 ip6-mcastprefix
ff02::1 ip6-allnodes

ff02::2 ip6-allrouters

Special Address in IPv6:
  1. Global addresses
  2. Link-local addresses
  3. Site-local addresses
  4. Unique local addresses (ULA’s)
  5. IPv4 mapped IPv6 addresses
  6. IPv4 compatible IPv6 addresses
  7. Special unicast addresses
  8. Multicast addresses
Reference: Please see RFC 1884 - IP Version 6 Addressing Architecture for more information. 

1.Global unicast addresses:
Address scope is the whole IPv6 Internet, Equivalent to public IPv4 addresses
Defined in RFC 3587:
2001:DB8::/32 – documentation-only prefix

2.Link-local addresses:


fe80::/10 This is a link-local prefix offered by IPv6. This address prefix signifies that the address is valid only in the local physical link.
Automatically configured on an interface using MAC address , Address scope is limited to the local link and shall used to send neighbor solicit messages

Eg: if MAC Address(48bits):                                                 00:90:27:17:FC:0F 
MAC Convert to colon hexadecimal notation :            ::0290:27FF:FE17:FC0F
The link-local address for the host is:                 FE80::0290:27FF:FE17:FC0F

3. Site-local addresses : Depricated and replaced by Unique local addresses

4. Unique local addresses(ULA):

fc00::/7 This is called the Unique Local Address (ULA). These addresses are routed only within a set of cooperating sites. These were introduced in the IPv6 to replace the site-local addresses. These addresses also provide a 40-bit pseudorandom number that reduces the risk of address conflicts.
Globally unique and are intended for local communications
Not routable on global Internet, routable within organization
Replaced the site-local addresses
Global scope, no zone ID required 

Defined in RFC 4193

5. IPv4 mapped IPv6 address:
Used by IPv6 only application to be able to deal with IPv4
requests.  Requires dual stack configured on the host. Defined in RFC 4291

Example:  IPv4-mapped IPv6 address for the IPv4 address 192.168.0.189 is:

0:0:0:0:0:FFFF:192.168.0.189 = ::FFFF:c0a8:bd

6. IPv4 Compatible IPv6 Address:
::/96 The zero prefix denotes addresses that are compatible with the previously used IPv4 protocol.

Used by IPv6 only application to be able to deal with IPv4 requests. Requires dual stack configured on the host

Example:  IPv4-comaptible IPv6 address for the IPv4 address 192.168.0.189 is: 
0:0:0:0:0:0:192.168.0.189  = ::C0A8:BD

7.Special unicast addresses:


::1/128 This is called the loop back address and is used to refer to the local host. An application sending a packet to this address will get the packet back after it is looped back by the IPv6 stack. The local host address in the IPv4 was 127.0.0.1 . 
Loopback unicast address – 0:0:0:0:0:0:0:1 = ::1
Similar to IPv4 address 127.0.0.1
Used by a node to send an IPv6 packet to itself
Should not be assigned to any physical interface


::/128 An IPv6 address with all zeroes in it is referred to as an unspecified address and is used for addressing purposes within a software. 
Unspecified unicast address – 0:0:0:0:0:0:0:0 = ::
Similar to the IPv4 address 0.0.0.0
Indicates the absence of an address


2001:db8::/32 This is a documentation prefix allowed in the IPv6. All the examples of IPv6 addresses should ideally use this prefix to indicate that it is an example.

8.Multicast IPv6 addresses:


ff00::/8 This prefix is offered by IPv6 to denote the multicast addresses. Any address carrying this prefix is automatically understood to be a multicast address. 

An identifier for a set of interfaces (typically on different nodes). Defined in RFC 4291.
Some reserved multicast addresses:

FF02::1 (link-local scope, all nodes on the link)
FF02::2 (link-local scope, all routers on the link)
FF05::2 (site-local scope, all routers in the site)

FF02:0:0:0:0:1:FFXX:XXXX (Solicited-node multicast address)

Tunneling:
Encapsulating IPV6 packets into IPV4 packets.IPV6 packets becomes the payload part of the IPV4 packets. It is called 6-to-4 tunnelling.

Neighbor Discovery Replaces ARP (Address Resolution Protocol):
Refs: http://ipv6.com/articles/general/Stateless-Auto-Configuration.htm

Example: TP link configuration of DHCP http://www.tplink.com/be/article/?faqid=855

a) Router Solicitation (request something): 
Send by host to routers with src address is the link-local address of the host and destination address is FF02::2

b) Router Advertisement: 
Send by routers periodically or in response to a Router Solicitation message, Source address is the link-local address of the sending router and Destination address is the unicast address of a node that sent a Router Solicitation or FF02::1

Stateless Address  Auto congiuration (SLAAC):
https://supportforums.cisco.com/document/97586/dynamic-address-assignment-ipv6-using-slaac-and-dhcp
http://www.ciscopress.com/articles/article.asp?p=2154680

Lets Hands on:
  • On Windows client:
    • netsh interface ipv6 install/uninstall
      • IPv6 is installed and enabled by default on Windows Vista and Windows 2008 Server
    • netsh interface ipv6 add address "Local Area Connection" fd00::c0a8:64
  • On Linux client:
    • ifconfig  eth0 inet6 add fd00::c0a8:c7/64
  • On Solaris client:
    • ifconfig e1000g0 inet6 addif  fd00:1:11:5a:214:4fff:fe86:1111/64 up

Experiences:
$ ping6 -I wlan0 fe80::3602:86ff:fe63:3b0c      == My link-local ip
PING fe80::3602:86ff:fe63:3b0c(fe80::3602:86ff:fe63:3b0c) from fe80::3602:86ff:fe63:3b0c wlan0: 56 data bytes

64 bytes from fe80::3602:86ff:fe63:3b0c: icmp_seq=1 ttl=64 time=0.038 ms

$ping6 -I wlan0 ip6-allrouters -n   
Routers responded back

Monday, May 23, 2016

XAMPP PHP errors


Sample : info.php to test PHP version <!--php // Show all information, defaults to INFO_ALL phpinfo(); // Show just the module information. // phpinfo(8) yields identical results. phpinfo(INFO_MODULES); ?--> Enable error on html Error #1: File not fount error <br/> <b>Warning</b>: simplexml_load_file(): I/O warning : failed to load external entity "../data/asset.xml" in <b>E:\xampp\htdocs\NFPDL\live\php\getAssetMenuListJson.php</b> on line <b>78</b><br /> <br/>